Friday, October 28, 2022

EAST SPRINGFIELD—AGAIN

Over the course of time and frequent operating sessions, one finds certain spots on a railroad that need extra attention. While I strove to build and lay track with care, I still have spots that confound my attempts to make them operate reliably well.  Such has been the case with my track at RR-East Springfield.  The switches installed there were among my very first that I built using Fast Tracks tooling and the first track I laid permanently.  Therein lies the likely source of my problems.  This spot has drawn repeated “fix-it” notes and several serious attempts to correct the perennial derailment issues.  I documented one of those previous efforts with:

https://espeecascades.blogspot.com/2019/01/track-realignment-at-springfield.html


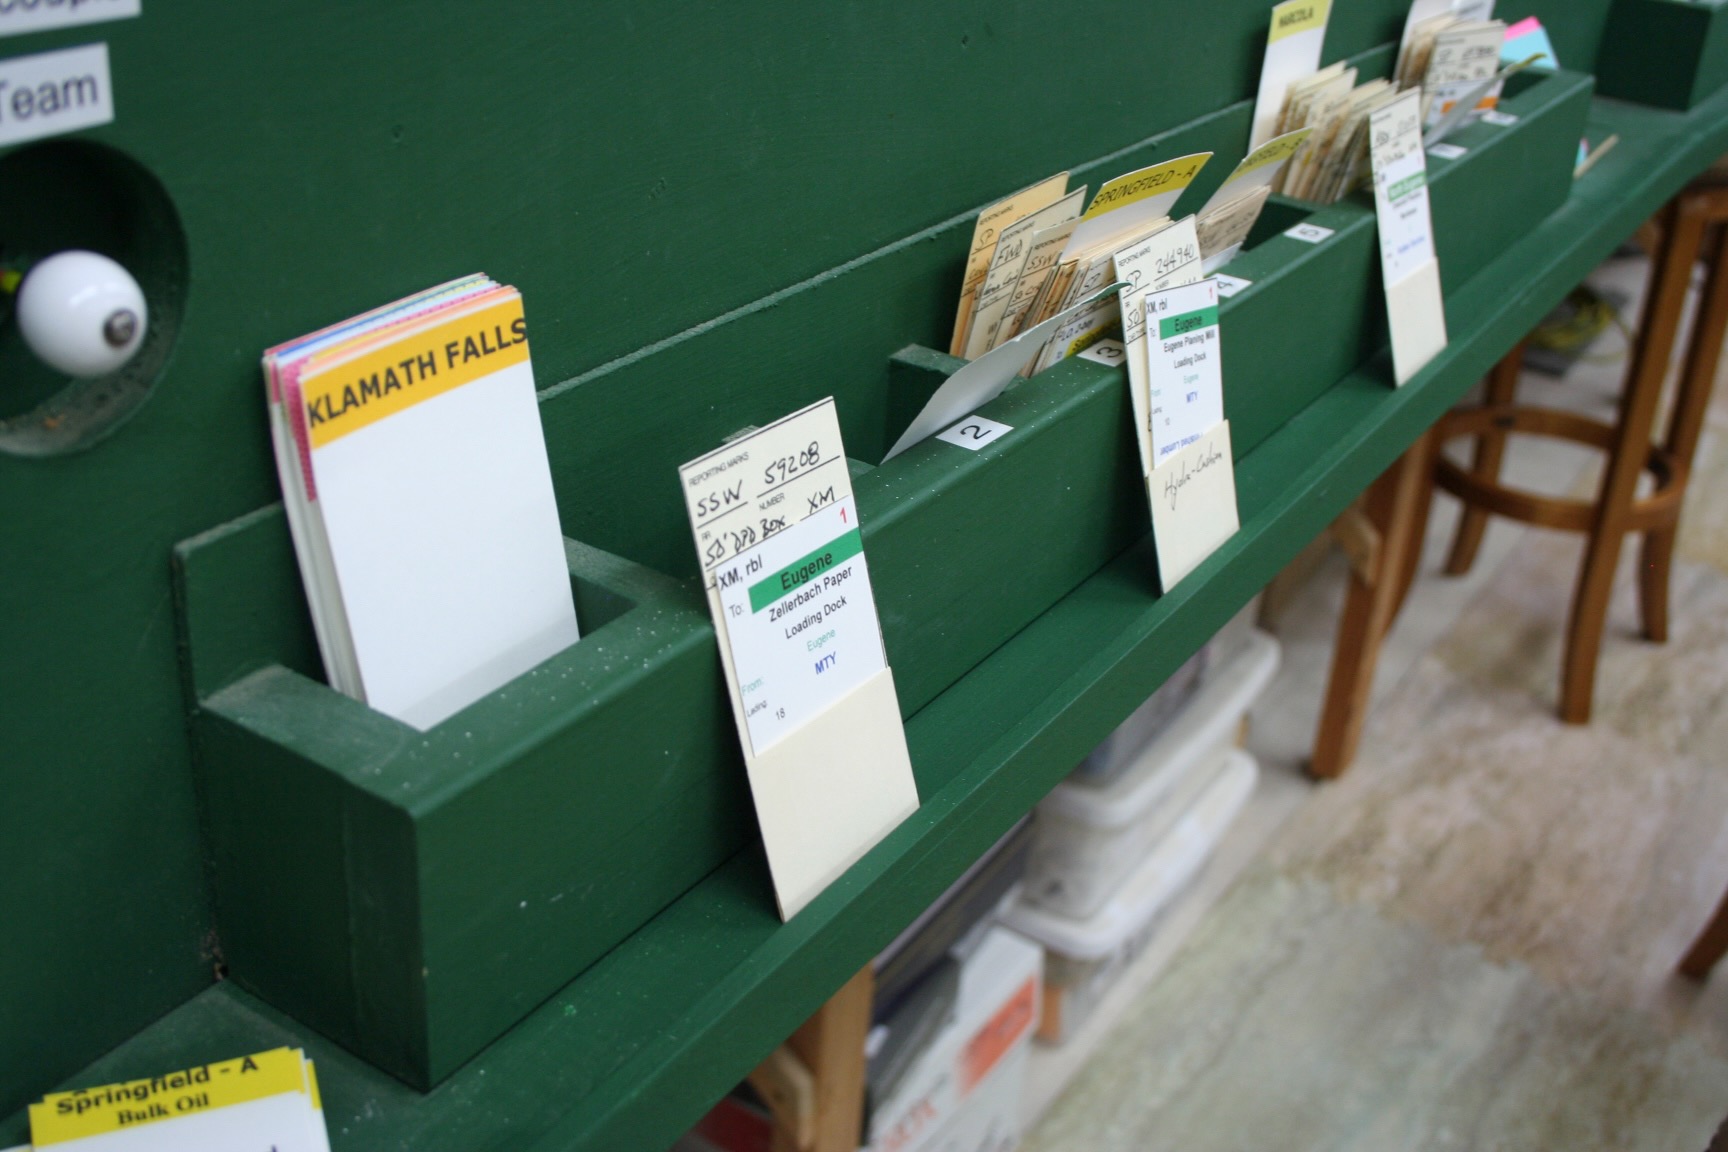
RR-East Springfield.  Track issues keep showing up in the two switches that are part of the mainline through this area.


In spite of my previous efforts, I continued to have problems in this area.  Taking another close look aided by a different selection of reader glasses, I spotted a funky almost-kink at the insulated track joint just beyond the points of the RR-East-most switch.  I attacked that problem by soaking the adhesive caulk holding the track with alcohol (50/50 rubbing alcohol is sufficient) and then lifting and resetting that track to eliminate the track joint issue.  The alcohol softens the caulk, but when allowed to evaporate, the caulk usually reforms to provide at least some bonding.  I added spikes on both sides of the insulated joint and made sure the joint was filled with styrene and filed the rail and joint smooth.


I then cross checked the switch geometry with a NMRA gauge.  While everything appeared in gauge, I took the opportunity to adjust the points a little.  Fast Tracks normally recommends a minimum clearance gap between the open point and the stock rail.  I have found my equipment (dominated by six-axle road locomotive) benefits from having a bit wider gap.  I recently found the awkward switch location up at Crescent Lake had too much distance between the frog and the frog guard rail.  I double-checked that, but this pair of #8 switches appeared to be fine.  Still, it was worth checking.


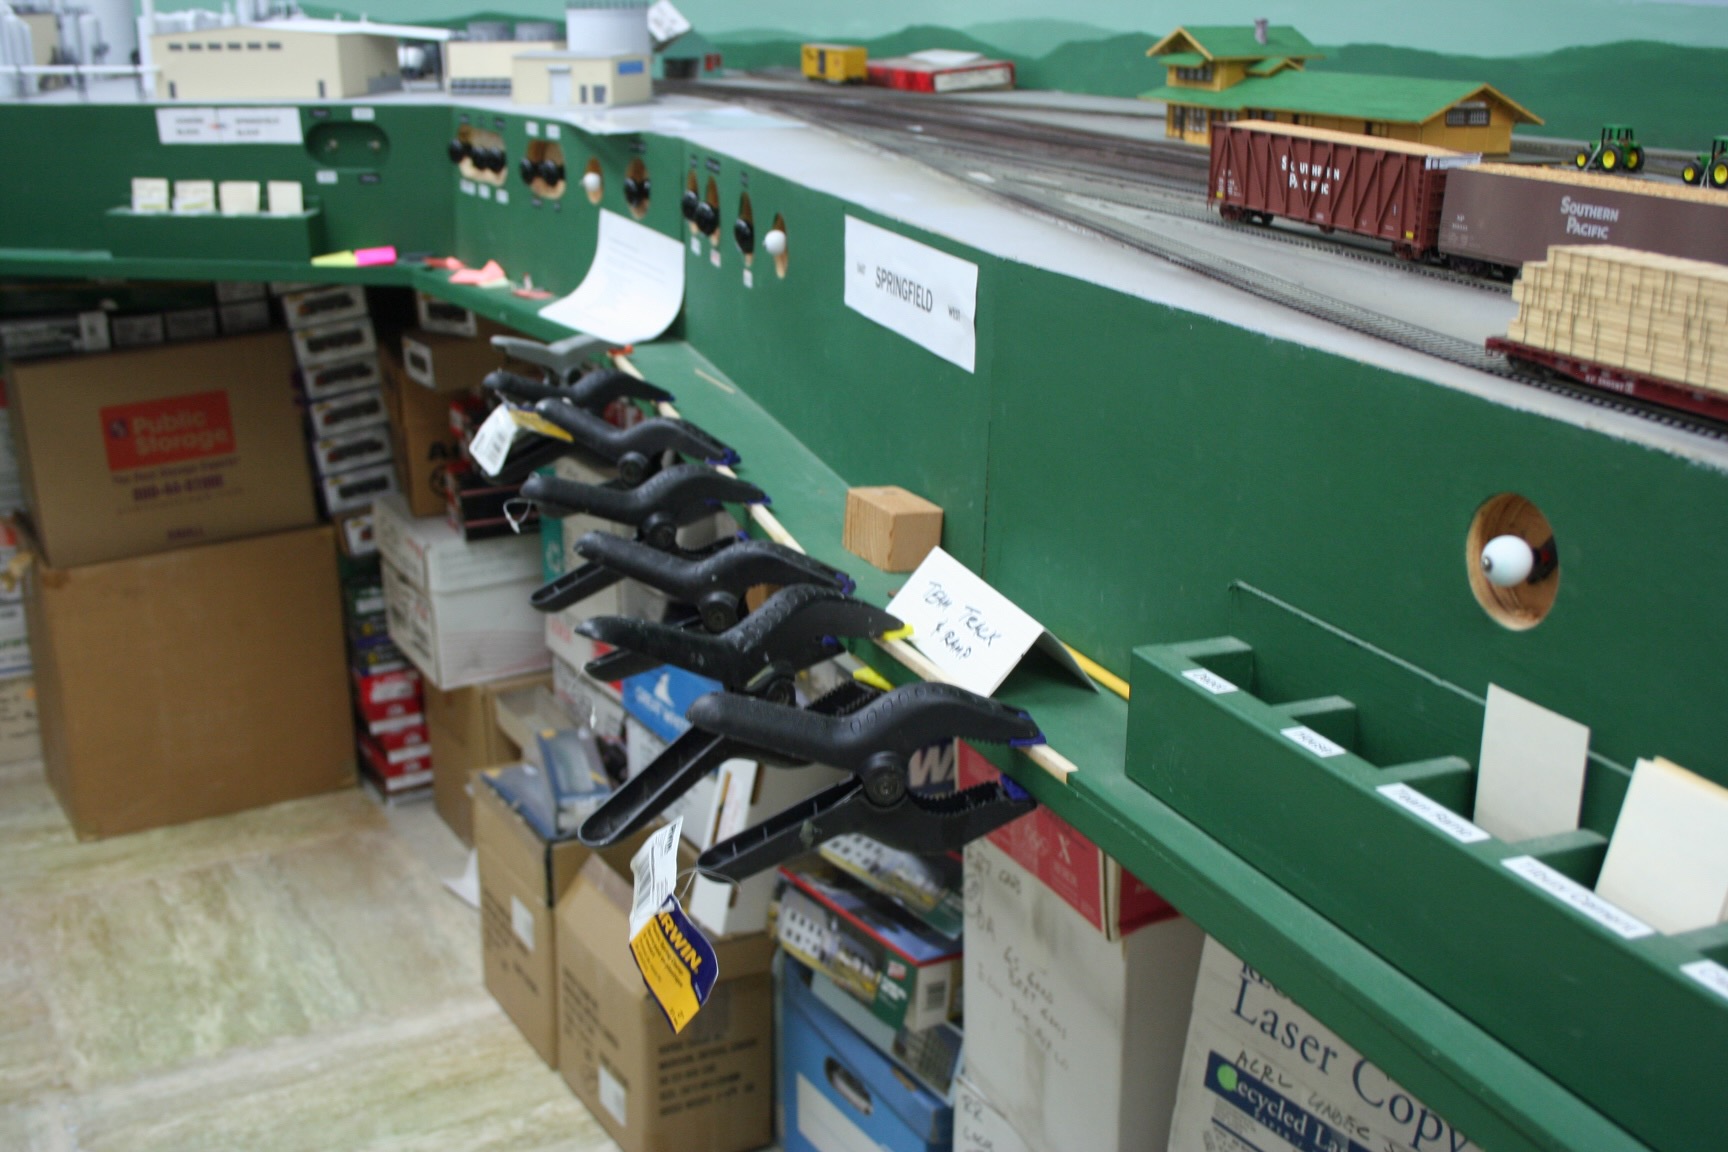
Reworked track at RR-East Springfield.  Note the short section of straight track just beyond the points.  This is some of the original track.  Just beyond that is the unpainted replacement track forming the curve.


While I was working in this area, I decided to try to reform the cork roadbed for the ballast slope.  That had been upset when I re-laid the curve leading into the switches back in 2019.  I tried using my finish router with a 45-degree bit.  While this helped form the ballast slope, it was hard to control.  I added a temporary edge guide—a piece of styrene taped to the base plate of the router.  The combination of that plus a very awkward work location led to me damaging some of the track.  That lead to pulling up most of the track curve and replacing it with a new section of flex track.  At this point the project was getting deeper and deeper into difficulty—far more than I expected with a “simple” track fix.  


Cutting the ballast slope into the cork roadbed at RR-East Springfield.


Cutting the ballast slope.  Note the wandering router cut.


I finally chose to leave the ballast slope cut for another day.  I critically needed to get the track back in service for another operating session in early November.  That session will show me whether I have finally cured this headache.

Sunday, October 16, 2022

OlyOps 2022

As we reemerge from our cocoons of the past couple of years, regular model railroad events are throttling back up.  OlyOps returned in mid-October.  This was a single-day local-regional operating event, drawing on “Boomer” operators within roughly 200 miles of Olympia, Washington.  Organizer Greg Wright has a well-polished routine for this event starting with a good selection of operating model railroads around Olympia, combined with a guest list built up over the years that invites operators from around the Pacific Northwest.  


The 2022 OlyOps featured eight local layouts (the typical number of layouts used).  Thirty-eight guest operators participated.  The event was arranged such that each Boomer (guest operator) operated on one layout in the morning and one layout in the afternoon.  Layout assignments were made by the Registrar with no preferences considered.  Layout assignments were picked up either Friday evening or early Saturday morning. 


The registration “fee” for the event was either canned food donation for the Thurston County Food Bank or a cash donation to same.  This year’s event raised $650 and eight very large bags of canned goods—a super response!  


Three of us carpooled up to Olympia from Oregon—regular operators on my railroad as well as me on theirs.  We were assigned as a carpool, so we worked on the same pair of railroads.  


Our morning assignment was on Scott Buckley’s Tehama Valley Railroad (TVR).  I previously operated there during a SoundRails event and was delighted to have a return visit.  Scott’s TVR represents a shortline in the California Sacramento Valley that runs east from connections with the outside railroad world at Hamilton City to locations east of Chico.   Separate interchanges with the Southern Pacific and the Northern California Traction Company (Joint ATSF and WP short line) are worked by TVR road crews.   TVR traffic includes produce and lumber shipped out via the Hamilton City interchanges.  


Craig L. works our train across the valley to pick up loaded produce and deliver fresh refrigerator cars at Walnut Grove on the right.  In the background is the bridge across the Sacramento River and on the left is the town of Colusa Junction..


The TVR is still under construction, but the basic operating pattern is well-established and supported by trackwork.  The layout is about half “scenicked.”  Structures include both kits and a number of scratch-built industries, notably the produce packers and other agricultural businesses.  I look forward to return visits.


Another crew works a less developed area representing Butte City in the middle of the layout space.  The Hamilton City interchanges are seen in the back-right of this view.  The railroad terminates at its east end at a turnback loop (unseen on the right) after passing through the lumber town of Oakville.


Our afternoon session was with Chuck Ricketts on his Baja Siena Railway.  This was a fanciful On30 layout set on an island off the northern Mexico coast.  Our operating session was scheduled to be the last formal session on the railroad in its current location.  Chuck sold the layout to Paul and Nancy O. who were on hand to assist and serve as one of the operating crews.  They will partially dismantle the layout and move it to their home in Seattle.  


Craig L. and Jim E. work the base yard and car float.  The mine tipple with live loads (steel ball bearings) where I worked is barely visible on the left.


Vic N. and Jim E. work the major town and industry area on the other side of the layout.


Chuck Ricketts began construction of the railroad until slowed by a major health event, whereupon Jim E. took over to complete track laying, wiring and generally assisting to bring the railroad up to its current state.


Though fanciful, the railroad proved a lot of fun to operate.  Four crews were kept active through the afternoon.  


OlyOps concluded with a dinner at the community golf course, attended by both the local crew and visiting operators.  We all had a great time and look forward to next year’s edition!

Sunday, October 2, 2022

RICK KANG

With a heavy heart, I report the passing of another of my great railroader friends, Rick Kang.  Rick served as a Dispatcher for the Southern Pacific at Eugene from the 1970s until that office was closed and consolidated to Roseville in 1989.  Throughout that time and later, he was a tremendous resource on railroad operations for the model railroad and railfan communities.  


From my time in the San Francisco Bay Area, I knew of Rick’s involvement with Jim Providenza’s Santa Cruz Northern model railroad in the North Bay area.  Being based in the South Bay, I never had the privilege of operating with Rick at that time.  Instead, when I retired and moved back to Oregon, I met Rick through operations at Tom Dill’s SP Siskiyou Line layout. 


Rick was immediately interested in my efforts to model the SP Cascade Line.  Rick was generous with information, time and effort to help bring my dream into reality.  He dispatched my first operating sessions and taught that art to my core group of laymen model railroaders.  Although I was experienced in the art of model railroad operations, Rick helped raise my and my crew’s knowledge and practice on my railroad.  Often times, Rick would arrive for an operating session with an envelope of new paperwork and instructions covering yet another facet of rail operations.  


Rick Kang dispatching my SP Cascade Line in June 2016.  The railroad was in raw shape with the Dispatcher situated in an area eventually covered by the crew platform for Crescent Lake.  The step ladder was used to access the Crescent Lake control panel.


Rick Kang advising and John B.—teaching laymen model railroaders the fine art of railroad dispatching.


Rick Kang interacting with Dispatcher Dave H.  The Dispatcher’s desk moved into our exercise room and gained a steel panel with track schematic.  By this point, Rick had trained several Dispatchers for my SP Cascade Line and had transitioned to a new role as Assistant Chief Dispatcher.  I didn’t know I needed one until Rick showed us the value added.  The ACD interacted with both Dispatcher and train crews, keeping the railroad moving while the layout owner chased gremlins.


Rick Kang added to the crew briefing, training all of us into better procedures.  Here he is reviewing proper radio procedure.


Rick Kang interacts with train crewman Jim L. in Rick’s role as Assistant Chief Dispatcher.


Rick was bright, focused, and always thinking about how to make model railroad operations more interesting and realistic.  For me, he was a mentor and friend.


Rest In Peace, Rick.

Thursday, September 29, 2022

AWKWARD SWITCH MAINTENANCE

In spite of good intentions and even fairly good execution, the design of my railroad inevitably produced a few difficult locations for track maintenance.  My September 2022 operating session emphasized the critical need to attack one of those tight space maintenance tasks.  My Crescent Lake staging yard features twelve tracks within a reverse loop.  The turnout ladder for the “West” end of the yard extends beneath the basement stairwell as the track passes from the main room to the “back” room where both levels of staging reside.  The switch for the number two track had caused trouble in June.  I thought my bit of work on this switch had fixed the problem, but the September session proved otherwise.


The Switch for Westbound entry to Crescent Lake Track Two is located just above the yellow track cleaner box car and alongside the reading glasses.  Note the stairwell covering descending from the ceiling to the right.


I pulled out my track tools and a step ladder.  I had to closely examine the troublesome switch in a very awkward space, some 7.5 feet above the floor and under the stairwell covering.  Close inspection with added lighting, vision enhancements, and an NMRA gauge quickly showed two problems.  The first was that the points were not throwing all the way over for entry to Track Two.  The second issue was too wide a distance between the guardrail on the stock rail for the frog and the frog itself.  For both problems, I can only note that things change over time, as neither had been an issue until recent operating sessions.


Having identified the problems, the solutions were relatively straight-forward, albeit accomplished in the tight space.   The frog guardrail required a simple application of soldering iron heat and a slight shift of the guardrail.  


The offending guard rail is pointed to by the needle nose pliers and tweezers.


The switch machine required opening up the main wiring termination panel for Crescent Lake.  I was able to slide the Tortoise by Circuitron™ switch machine fulcrum tab downward on the machine to increase the throw-rod throw.  With increased force on the points I added spikes on the outside of the stock rails at the points to help keep the rails in place.


This low-light, jiggled picture illustrates the problem of getting into the switch machine for adjustments.  The switch machine is the green block with a yellow label up under the maze of wire.


My staging and track cleaning efforts through this switch indicate my repairs were successful.  This is all part of what it takes to have an operating model railroad.

Friday, August 26, 2022

TREES FOR THE FOREST—ROUND TWO

Casting about for summer projects, I decided to tackle more trees for my forest.  I settled upon “furnace filter” speared onto trunks as my basic construction technique for Douglas Fir—the dominant tree in Western Oregon.  I described the technique in my first post on this topic:

https://espeecascades.blogspot.com/2018/12/o-tannenbaum.html


I settled on using tree materials from Coastmans Scenery Products:  https://www.coastmans.com/  Coastmans supplies finished trees, tree kits and separate materials:  trunks and branch material.  So far, I have just used the kits, but am about to move to using just the trunks and branch material (mat) as I don’t need much of the other material in the kits, at least for trees well into my forests.  


My first efforts toward making Douglas Fir models were a bit disappointing.  Following instruction by Roger Rasmussen at the 2018 NMRA_PNR Convention in Portland, I split the branch mat material into thin slices before gluing them to the tree trunks.  My efforts left a bit too much space between the disks such that the trees really did not capture the bulk of foliage I see all around me here in Oregon.  That left me disappointed and led to the long wait until this second effort.  As with most artistic ventures, one learns by doing.  I just needed to move that process along.


My earlier blog post (O Tannenbaum!) describes the basic procedure, but I will briefly recap here.  Working over oven pans to capture and control the ground foam that sheds from the branch material mats, I tore suitably sized “disks” of material.  Actually, the “disks were more like squares, but they get further shaped by tugging on the mat material and later trimming it on the developing tree.  I used an awl to poke a hole in the center of each “disk” and then slid the disks down onto the trunk, gluing them in place with white glue.


Making trees.  Working over oven pans helps corral the ground foam shed from the branch material mats for reuse as flocking.


Once the branch material glue sets, further trimming with scissors helps shape the tree.  Spray adhesive is applied and then the ground foam is sprinkled liberally upon the tree “branches.”  Upon reflection, my first effort spaced the branch disks a bit too far apart.  I also did not apply quite as liberal a coating of ground foam as I did on this second round.  As I expected, I needed to augment the flock from the tree kits with more ground foam.  Coastmans uses Woodland Scenics Conifer green Coarse Turf (T1366) on the branch mats, so it is easy to augment the ground foam supply.


Flocking the tree branches.  The three trees on the left have been flocked.  The three on the right are ready for flocking.  Note the space between the thin branch disks on the second tree  from the right.  The flocked trees had similar gaps.


The trees for Round Two.  Most are nine inches tall.  The two in back are eleven inches tall—still short for old growth Douglas Fir.  Both are suitable for layout scale.


I am much happier with my second effort at tree making.  The keys to success were a bit closer spacing of the branch mat disks on the trunks and a more liberal dusting of turf “flocking.”  With this success, I am ready to start my production line.  Think thousands of trees….

Saturday, August 6, 2022

THE RAILROAD AT YEAR TEN—A DECADE!

 THE RAILROAD AT YEAR TEN—A DECADE!


August 1 marks the anniversary of the start of construction for my SP Cascade Line.  It is now ten years since I began this construction and operations adventure.  I do an annual photo survey of the railroad at the beginning of August each year to document my progress.  Last year’s photo survey may be found at:  https://espeecascades.blogspot.com/2021/08/the-railroad-at-year-nine.html  From there, one can work back through the years to the beginning in 2012.


This past year’s effort was that of consolidation following the installation of the long-awaited second main line between the Eugene Arrival-Departure Yard and the Eugene Depot area.  Structures were the theme.  That new main line track fixed the space available alongside it for industry.  I succeeded in filling the six new industrial spurs with structures before activating service to those spurs--no folded index card signs this time around!  I also completed construction of the Springfield depot using a recent laser-cut kit produced for the Southern Pacific Historical and Technical Society.


This year we will follow an RVEUY (Roseville to Eugene manifest freight) as it treks over the railroad from Crescent Lake to Eugene.  This is a RR-Eastbound move as it is away from corporate headquarters in San Francsico.


SP 7308 East begins its journey over the Cascade Subdivision of the Oregon Division as it leaves Crescent Lake.  This twelve-track reverse-loop staging yard represents the RR-West (geographic south) end of my railroad.  The yard is laid on panels suspended from the ceiling.


SP 7308 E rolls through Cascade Summit.  No need to stop here, as our locomotive units are in good shape, especially their dynamic brakes.


Winding our way down-hill through tunnels and rock sheds, we cross the first of three large steel viaducts at Shady Creek.  This scene also shows McCredie Springs on the lower deck, separated by about 2.5 feet of elevation.  Total railhead climb on my model railroad is a bit over three feet.


After the Shady Creek trestle, we roll through Cruzatte.  In days of steam power, this was a mandatory wheel cooling stop as light brake-shoe pressure was set at the summit.  With dynamic brakes we do not need to set those brake-shoe retainers so we keep moving.


Perched between two tunnels and rock sheds, Noisy Creek is the second of the large steel viaducts on the line.


Salt Creek Trestle is the third, longest and final of the large steel viaducts we cross on our way downhill.  This trestle crosses both Salt Creek and Oregon Highway 58—the Willamette Pass Highway,


After crossing Salt Creek Trestle, my railroad rolls through Wicopee.  I had to compromise during layout design to put the trestle on the opposite side of this important siding.  Wicopee is the mid-point in the climb up from Oakridge to the summit.  It was a habitual water stop with steam locomotives.  It still has an active water tower to support forest fire fighting.


Montieth Rock, also known as Rooster Rock, is an interesting volcanic plug below McCredie Springs.


Salmon Creek is just outside Oakridge.  The track on a temporary “bridge” in the foreground leads to the Pope and Talbot mill on the geographic east side of Oakridge.


SP 7308 E continues to roll through Oakridge.  Oakridge was the historic steam helper station at the base of the climb up over the Cascades.  While the SP closed it down when steam was replaced by diesels, I retain it as my helper station.  The rear of the Oakridge Turn local freight train is in the foreground.  This tends to be a big train as it serves the two big sawmills that bracket Oakridge:  Pope and Talbot and the former Western Lumber at Westfir.  We see the Pope and Talbot loads at the rear of the train.


Our train crosses the North Fork of the Willamette River as it exits Tunnel 22 from Oakridge and enters Westfir.  The former Western Lumber Company mill was owned by the Edward Hines Company in its final years of operation.


SP 7308 E swings around industry on a branch on the geographic east side of Springfield.  The old agricultural business is being replaced by forest products industries such as Neste Resins (now Arclin).


Continuing into Springfield, we pass the large Rosboro Lumber mill, still very much active.  I had to selectively compress my models of prominent structures of the mill complex.


SP 7308 E continues to roll through Springfield past the Springfield Depot.  The delightful Queen Anne style depot has been moved and preserved to serve the Springfield Chamber of Commerce.  I was delighted when the SPH&TS produced a kit for this depot plan—the second most common depot plan on the SP.


We cross the Willamette River on our way from Springfield into Eugene.


SP 7308 E works its way into Eugene.


SP 7308 E passes the Eugene depot and freight depot.  The passenger depot remains in service for Amtrak.  My layout planning led to placing my classification yard in front of the depot scene.  This yard serves the industry physically modeled on my railroad.  It is very similar in function and size to the Blair Street yard which was the original yard at Eugene, before the large hump yard was built along the mainline with construction of the Natron Cutoff (toady’s Cascade Line) in 1926.


SP 7308 E completes its trek over the Cascade Subdivision as it rolls into the Eugene Arrival-Departure Yard.  Seen in the background are some of the new industry structures completed as part of the track project in this area over the past couple of years.


I hosted nine formal operating sessions and two small group sessions this past year, returning the railroad to its intended purpose.  The crews have been smaller than those of years past as everyone is more cautious and selective about activities.  Still, we have managed to enjoy the hobby!

Saturday, July 30, 2022

FASCIA SHELF EDGING

One of the challenges for an operating model railroad is to provide adequate facilities and layout equipage to perform the intended operating tasks.  I use car cards and waybills to direct freight car movement on my railroad.  This presents the challenge of providing places for operators to sort the car cards and verify the freight cars being directed by them.  This is particularly important in yard operations, but it also shows up anywhere significant industry switching takes place.


As I built my railroad and attached fascia to the layout edges, I also installed 1x4 shelves at the base of the fascia wherever I thought significant switching or sorting might take place.  My car cards are four inches tall, so that a 1x4 shelf should have been sufficient for holding the car cards--horizontally.  It turns out many operators prefer to place car cards vertically.  I accounted for that in the immediate vicinity of the car card boxes by installing shelf edging in the form of ¼-inch square wood strip.


Fascia shelf edging in front of the car card box set for the Eugene Classification Yard.  Car cards can still be placed on the shelf for sorting close to where their cars are on the yard tracks, held in place by the shelf edging.


As I gained experience with the operation of my railroad, I observed what the operators were doing with the car cards. Some would simply prop the car cards up on the layout, propped against their car.  I have been trying to avoid that and discourage that, as it breaks the visual flow, at least to me.  Still, they need to do something with the cards as they verify and sort.  


Car cards placed on fascia shelf in front of the cars they belong to.  Fascia shelf edging keeps the car cards from floating to the floor while allowing vertical card placement.


For the past several months I have been on a campaign to install shelf edge strips on all of the fascia shelves on my layout.  This project has been constrained by the availability of ¼-inch square strip wood.  I began with the entire Eugene Yard shelf and then began adding edge strips at Springfield.  I finally scored a significant supply of wood strip, enough to complete edging all of the fascia shelves on the layout. 


Additional fascia shelf edging being installed, filling the gaps between car card boxes where the edge strips were installed originally.


I have had several operating sessions since I began this project.  The shelf edge strips seem to help.  Away from the yard and intense switching, I also have edged the shelf at Cascade Summit.  This edge striping definitely has helped, as my shelf mounting there led to a slight outward tilt of the shelf.  The edge stripping keeps objects placed on the shelf there and not rolling to the floor.    At least something has benefitted!