Monday, April 8, 2019

THIRTY-FIFTH FULL OPERATING SESSION

Following my usual schedule of First Saturday operations, I just held my thirty-fifth full operating session.  In contrast to sessions earlier this year, this one had a light turnout, though just enough for all needed positions to be manned.  Operating session attendance ebbs and flows with no particular pattern that I can discern.  This session had quite a number of my regular operators down with various medical maladies--the impact of late winter bugs, I guess.

In spite of, or perhaps because of the smaller crew, this became a very successful session in spite of a derailment event toward the end of the session, recorded below.  With a low crew count, all but one local freights were run with single man "crews."  This may have been a contributor to the easy-flowing successful session.  There were less folk in the aisles and less distractions.  

In spite of the low crew count, we still doubled up on the Dispatching job, as Vic N. gains experience with the Direct Traffic Control system used on my railroad.  Vic dealt with the "valley" portion of my railroad between Eugene and Oakridge. Early on, he had heavy traffic with a couple of through road freights and the Oakridge Turn returning to Eugene via switching at Westfir.  This lead to a three-train meet at Springfield.


Vic N. and John B. work the Dispatcher's desk.  (David Lange photo)

Later on, more meets took place at Springfield, this time with one of the Springfield local freights in town.


Brigg F. and Craig L. work the First Springfield job (depot side of the mainline) while Jereon G. and Bill M. (just beyond the backdrop edge) guide their through freights through a meet at Springfield.


The Eugene Yard crew works, including the Eugene City Switcher, which serves the industries near the depot.

Meanwhile, other parts of the railroad saw plenty of action.  Included in that was a pair of private cars tacked onto the rear of Amtrak Number 14, the northbound Coast Starlight.  Salt Creek Trestle is a popular photo spot on my railroad.  


Amtrak Number 14 crosses Salt Creek Trestle with a pair of private cars tacked onto its rear.


Later on, an OAEUY (Oakland to Eugene manifest) crosses Salt Creek Trestle. Yes, the photographers were out and about!


Bill M. guides his train past Westfir and through the S-Curve into the Natron Block.  I continue to enjoy trains snaking through that S-Curve.


Craig P. held the Assistant Chief Dispatcher job for this session and did a very good job.  He successfully got crews assigned (crew caller part of his job) and got the traffic moved over the railroad, completing all trains on the twelve-hour line-up prepared for this session.


Rodger C. and Jim L. successfully got their train into Cascade Summit.

Toward the end of the session we had an operating event that nearly stalled the rest of the session.  A slight hiccup on the head-end power on a train climbing into Cascade Summit resulted in too much force applied by the mid-train helper, resulting in a derailment inside the Summit Tunnel.  This drew a crowd.  Accidents always do--grin.  Expecting such an occurrence (a derailment inside a tunnel), my fully-lined tunnels have removable side walls on the room wall side of the tunnels.  This still required me to reach up under the layout to remove the panels and then remove the offending cars.  This took a fair bit of bending and reaching on my part, but I eventually cleared the derailment.  Meanwhile, whenever I popped out from under the layout, I could see most of the operating crew nearby, "supervising" the activity.


I am bending to get in under the Summit Tunnel to clear the derailment inside the tunnel.  The rear half of the train has been reassembled to the right of the tunnel on the upper line, while the train crew watches from the platform.  (David Lange photo.)


A crowd has been drawn to the scene of the accident, but they grew bored and began watching activity still underway at Oakridge (lower level, left). (John Brock photo.)


The crowd of on-lookers could not resist the photo opportunity.  (David Lange photo.)


Eventually I pulled out the last car wedged into the tunnel.  (David Lange photo.)

Although one hopes not to have derailments in tunnels, the reality is that they will occur.  This was the first serious derailment inside a tunnel for my railroad and the first time I needed to remove a tunnel liner wall.  Nonetheless, I am happy I was able to clear the problem after fifteen minutes or so, albeit with a bit of contortion on my part.


Friday, March 29, 2019

TRAIN ORDER OFFICES

The primary means of train control (dispatching) I plan to use on my SP Cascade Line will be Centralized Traffic Control (CTC)--once I install the required electronics and create a CTC panel.  CTC was installed on the climb up over the Cascades in 1955.  Prior to that, Timetable and Train Orders (TT&TO) ruled traffic movements.  I retain the objective to use TT&TO for at least some sessions at a future date. A physical reminder of TT&TO operation will be the Train Order Offices placed roughly every other siding up the hill.  Indeed, my selection of which siding/stations to model on my railroad featured T.O. Offices. In spite of building my railroad with the intent of using CTC for traffic control, I still have an active interest in the infrastructure that supported its predecessor (TT&TO), including the Train Order Offices.

Cascade Line modelers are blessed by a full set of company structure kits to represent the remote "villages" that supported Train Order stations.  A typical station had a Train Order Office, three houses for the shift Train Order operators, and housing for the track maintenance section gang and their foreman. Many of the T.O. Office stations also had a signal maintainer.  All of these structures plus miscellaneous support structures are available as kits from ALW Lines:
http://alwlines.com/  With such a rich resource available, I just "had to" model these villages, even though they were mostly gone by the 1960s.  Treat this one as modelers license.  

ALW Line kits serve to model Cascade Summit, Cruzatte and Wicopee.  I will need to model the McCredie Springs T.O. Office separately, as it followed a different plan.  The three offices I did model started the same when built for the SP in 1926, but a freight section was added to the Cascade Summit station soon after the line was opened.  Fortunately, ALW Lines can supply a structure kit for this extension as well.  

As with the tool sheds, I prepared for construction by priming the laser-cut wood pieces.  For the T.O. Offices, I found it convenient to apply the peel and stick trim pieces to the sides before painting and subsequent assembly.  I applied a coat of white primer to both sides of the structure pieces.  The interior surfaces were painted with an off-white paint, while the floor received a basic brown paint.  The exterior was painted with my dwindling supply of PolyScale PRR Buff-- a good match to SP's Colonial Yellow structure color.  


Cascade Summit Train Order Office sides painted "Colonial Yellow."

Once painted, I began assembling the walls, using the floor as a core.  I glued one or two sides to the assembly at a time, letting the joints set before moving on to another wall.  I held walls square with weights.  The final set of walls were held to in place with rubber bands.


Train Order Offices under construction.  Cascade Summit, on the right, has all wall sections in place, with the final sections held with rubber bands.

The original ALW Lines kits used laser-cut peel-and-stick shingles. Later production, exemplified by my Cascade Summit kit, feature laser-cut shingle roof panels.  These are much easier to install--certainly much faster. They also look quite good.  Kudos to Bruce Barney for improving upon an already good kit!  


Train Order Office roofing.  The "standard" office in the foreground uses the old peel-and-stick shingles.  The roof panels have guide lines etched on them to help locate the shingle rows. The Cascade Summit office in the background has the more recent full roof panel shingles.  One side has been applied with contact cement and the other side is upside down on the left, ready to be installed.  

As I completed each T.O. Office structure, I placed it on the layout where it will be planted.  Most sites will require additional footings or even a full set of walls below the station. This is particularly the case for Wicopee, which literally was hanging on the edge of the mountainside.


Wicopee Train Order Office on site.  I need to build support walls to raise the office to railhead height.


Cruzatte Train Order Office.  


Cascade Summit Train Order Office.  

Whether I leave the Train Order Offices in place on the railroad for more modern year operations is yet to be determined.  Meanwhile, I can prepare their sites on the railroad.  Even if I remove them, the T.O. Offices still leave footprints of where they once stood.


Sunday, March 17, 2019

WINTERAIL 2019

The annual rail photography exposition known as Winterail was held at the Corvallis High School Performance Arts theater on Saturday, March 17.  This was the 41st edition of this late-winter classic, now held here in Oregon after decades in Stockton, California. Winterail spawned a number of similar events around the country, but it will forever be known as the first such exposition.

Without having the emphasis of a major anniversary year such as last year's celebration (https://espeecascades.blogspot.com/2018/03/winterail-2018-and-special-operating.html), I would rate this year's edition as "average."  It had highs and lows.  Fortunately, the highs were more than sufficient to keep one coming back.

Winterail began with a large railroadiana show in the morning.  Lots of books, photos and other materials were offered for sale.  This always has been an important part of the event.  My library and reference material collection grew over the years from items obtained during this part of the event.


Railroadiana sales held in the Corvallis High cafeteria.  Author Dave Houston is in the foreground selling his new book.

As noted, friend Dave Houston just had a new book published by Four Ways West Publications:  "Southern Pacific--1960s to 1990s, Volume One - Sacramento to Sparks, The Story Behind The Picture."  Dave's extensive captions describe much more of the tale illustrated by the pictures selected from his collection (most shot by him).  


Book Cover for Dave Houston's new book.

As with so much of Winterail for me and others, the event provided a focus for us to see and catch up with old friends from past railroad events and associations.  Indeed, I spent part of the late afternoon catching up more with Dave Houston.


Vic and Annie Neves introduce Winterail 2019 in the Corvallis High Auditorium.

The "main event" of Winterail is a series of photo shows set to music and narration.  Afternoon highlights included the lead-off show on Tehachapi by Scott Allen Sparks. That was followed by a twenty minute excerpt from a video produced this past year by Catenary Video Productions: "Southern Pacific's San Francisco Peninsula Route."  This video produced from movie footage of the mid 1950s features lots of late steam-era action in what had been my old "stomping grounds" from my (paid) working life.  A Cascade Line note on the Catenary Video Productions SP DVDs:  the first two volumes in this five-volume series feature the Southern Pacific Shasta Route.  The second volume concentrates on Oregon and the modern mainline climb over the Cascades.  I just replaced my VHS tape copies with the more useable DVD format.


SP San Francisco Peninsula Route DVD.

Other afternoon programs included a look at railroading in North Dakota, including the depths of winter, a "Missouri Scrapbook," and "Steam on the Oregon Coast Scenic Railroad."  The Oregon Coast Scenic program featured photography from a pair of steam excursions on the railroad, including extensive use of a photo drone. This is a developing art form, distinct from more conventional fixed photography.  This show, as with several others could benefit from editing--a reminder to all that "less is more."  Just because one has the photos or footage does not mean all should be shown. Keep the audience wanting more. Repetitive shots and angles get tired very quickly, no matter how beautiful the subject matter.  

The evening program (after the dinner break) led off with friends Charles and David Lange's look at "Three Generations of Railroad Photography," which featured their and Charles' father's railroad photography. The Lange's well-earned their evening lead-off spot with three distinct looks at rail photography.  A Jim Boyd photo tribute remembered Jim's work and impact on the railfan community.  Thank you to Mike Schafer and Craig Willett for putting this show together.  

The highlight of Winterail 2019 for me was Ted Benson and Tom Taylor's "Feather River Roots -- Discovering the Western Pacific, 1965--1970."  I have been a fan of Ted's work for some time and was quite familiar with a number of the photos used from their use in various publications.  Still, it was great to see these images again in the context of Ted and Tom's development as railroad photographers.  Yes, I want to see more!

A show on wintertime operations by the Union Pacific over the Blue Mountains in northeastern Oregon completed the good to great shows for me.

Winterail remains a great rail photography event.  It is clear a new generation of photographers with access to wonderful new technology (digital cameras, video, photo-drones) is expanding the art.  Meanwhile, there remains a place for more classical presentations.  Winterail attempts to feature both.

Thursday, February 28, 2019

TOOL AND SPEEDER SHEDS

A structure located along all rail lines has been a tool shed used by track workers and others to store tools, supplies and, in earlier times, a speeder.  Back in the day, track section gangs were located about every ten miles along the line. Each gang had their own tool shed and usually their own speeder--the relatively lightweight motorized conveyance they could use to patrol their section of track and to bring tools and supplies to a work site.  Most railroads had standard designs for such structures.

Southern Pacific modelers are quite fortunate to have the line of Common Standard plan structures produced by Bruce Barney of ALW Lines (http://alwlines.com/).  Most of Bruce's SP structure kits were inspired by SP Common Standard plan structures along the Cascade Line.  SP Cascade Line historian and modeler Larry Castle worked with Bruce to develop these structure kits.  This makes for an easy equipage of my version of the Cascade Line with an appropriate array of company structures.

I have begun populating my railroad with that most basic structure--the tool shed.  Indeed, these were the first structure models produced by ALW Lines.  I started the tool shed effort sometime back during the primary layout construction, but set the sheds aside as other tasks (like track switch construction took over all available time.  I have been "shifting gears" lately after the major scenery terrain push of the last year.  Indeed, some of that "gear shifting" left me in "neutral," not quite sure where to focus my efforts.  The tool shed project provided a handy focus and a way to get myself back into a model-building frame of mind.  Layout construction took all of my efforts over the past half dozen years, but it is time now to return to model work!

I elected to build a half dozen "SP3" large tools sheds and four "SP2" small tool shed kits.  These will populate my mountain grade, from Oakridge to Cascade Summit.  Oakridge had several large sheds and one small shed.  The mountain sidings generally had one large tool shed and a small tool shed used by the signal maintainer wherever he was based.  For my layout, only Cruzatte does not have the signal maintainer on station.

The kits feature laser-cut plywood and other materials, allowing for relatively speedy construction.  I began my construction by painting the plywood frets with a white primer spray paint to seal the wood and provide a good color base.  The white also served as the final color coat for the laser-cut windows of the small tool shed.  I then painted most of the structure pieces a "Colonial Yellow" using an old PolyScale paint ("PRR Buff").  With the demise of Floquil and PolyScale, I do not have a replacement color to recommend. 


Tool shed pieces painted and ready to be cut from their frets and assembled.

I studied photos of SP standard structure paint in the post-WWII era and into the 1950s and '60s.  Compared to the earlier paint standard that used a lot warm brown trim paint, this was simplified by the time periods I model to mostly door and window frames getting the trim color.  My mix for the brown trim paint used former Floquil/PolyScale colors of 2:1 "roof brown to armour yellow."  Again, I do not have a currently available paint mix to recommend.  

Assembly was straight-forward.  The peel-and-stick trim was applied to the walls and then the walls assembled around the floor base.  For future assemblies, I will try not to rush myself by gluing just one side wall and end wall to the base first and then returning at a later point to complete the other walls.  I found it useful to brace the roof panels with strip wood, including one that helps form a ridge beam.  

My kits were all part of the orginal production by ALW Lines.  As such, they use peel and stick shingles.  Over time, the adhesive has become weak.  I augmented the shingle adhesive with a thin coat of Weldon contact cement applied to the roof panels.  After this set up for about fifteen minutes, I began applying the shingle strips.  Bruce Barney did a very good thing when he designed these kits as he had shingle guide lines etched onto the roof panels.  Applying shingles is still a tedious job, taking about half an hour per shed roof.


Applying shingle strips to the shed roof.

Finally, I could paint the roofs and touch up the trim paint.  Once again, I used an old Floquil/PolyScale color (depot green) for which I do not yet have a good recommendation for an available replacement.

With my batch assembly completed, I posed the sheds together before distributing them around the railroad.  Final installation will occur as I complete scenery at the stations, to include the motor car pull-offs.  


A row of tool sheds ready to be distributed around my railroad.

Sunday, February 3, 2019

OPERATIONS ENHANCEMENTS SUCCESS!

Over the past month, I made and reported on a couple of enhancements to my railroad aimed at improving and enhancing operations.  Notable was the track realignment at RR-East Springfield (https://espeecascades.blogspot.com/2019/01/track-realignment-at-springfield.html) aimed at clearing a chronic source of derailments.  Another project created moveable track assignment tags (https://espeecascades.blogspot.com/2019/01/track-labels-for-operations.html)for use by yard crews.  Both projects needed testing by my operating crew.  I am happy to report both enhancements were resounding successes!

No new trouble tags were generated at RR-East Springfield.  This marks clearing a major trouble spot.  The moveable track use tags received even more glowing reports. The yard crews working in both the Eugene Classification Yard and the Eugene Arrival/Departure Yard were quite enthusiastic about those tags.  Switch crews no longer needed to refer to the car card slots with their destination tags or ask the Yardmaster.  As noted in the earlier blog post on this topic, the ends of these yards are away from the car card slots.  Indeed, they asked for additional destination tags to cover destinations or classifications not provided in the initial set of tags.  They also resolved the question of label tape format.  Conventional black lettering on a white background was more easily read and comprehended than white letting on a black background.


Chuck C. (near) and Brigg F. (far) work both ends of the Eugene Classification Yard.  Destination track tags are placed at the near end of tracks 2 and 3 (Right to Left count).  Indeed, two destinations have been designated for Track 2.  In the far distance to the right of this view, a through freight effortlessly passes through the RR-East end of Springfield.


The Eugene Arrival/Departure Yard crew (Santa Clara Tower job) composed of Scott B. and Craig P. is all smiles as they keep their work organized and efficient through use of the track tags.

While the big news of the just-completed 33rd full operation of my SP Cascade Line was the improvement made by this pair of operations enhancements, the rest of the operation provided plenty of enjoyment and satisfaction for the full crew.  Herewith additional photos from this Groundhog Day session.


Early in the session, the Oakridge Turn worked Westfir (left, lower) on its way back to Eugene.  Meanwhile, the LABRT crosses over Salt Creek Trestle (right, upper) as it descends toward Eugene and then Portland (SP BRooklyn Yard).


An EULAY winds its way around the Marcola Branch area on its way up the mainline toward Westfir and Oakridge.  The S-curve in the mainline is a favorite railfanning spot.


Tom D. and Jim M. work the Springfield-A job on the depot side of the mainline at Springfield.  The Springfield jobs are split by the mainline and phased to keep both the mainline and a passing siding clear for mainline traffic.


The EUKFY works through Westfir on its way to Oakridge while traffic on the mountain grade is at Wicopee and working through Tunnel 12 and Salt Creek Trestle.


The EUKFY gets a helper placed mid-train in Oakridge.  Dick K. serves as the helper engineer.


The helper power is removed from the EUKFY at Cascade Summit.  At Dispatcher's discretion, this move often is most easily done by using the Lake Siding (outer edge--left), allowing easy access for the helper into the Beattie Spur (actually a double-ended siding) where it can rest awaiting Dispatcher permission to return downhill to Oakridge.


A helper set returns light downhill crossing Shady Creek Trestle.

As my railroad, equipment, track, and operations mature, I find myself hosting full operating crews to the point where I must turn away late responders to the crew call.  This is a happy condition to be in!

Thursday, January 31, 2019

TRACK LABELS FOR OPERATIONS

One of the challenges for operating crews is organizing yard tracks for efficient switching.  Our operating crews are not "on the ground" at scale size where they would be able to read switch target labels.  They also do not do this job day in and day out.  One of the ways I have tried to help my yard crews was to provide track number labels at each end of the yard tracks.  This at least conveys a common understanding of the track numbering, but still does not convey use of those tracks.  Even the track number labels disrupt the visual flow, but I view that as a necessary evil to promote a common reference for operating crews.

Most model railroads have limited classification tracks.  Mine is no exception.  The practical limit for number of classification tracks often involves arm-reach distance and viewing distance.  The consequence of this is the multiple use of classification tracks during an operating session for sorting to different locations or trains.  With a yard crew of more than one, this means communication, often from the person designated as Yardmaster to the person or persons designated as switch crews.  An important part of the Yardmaster's job is organizing the yard for the work at hand.  My Eugene Arrival/Departure Yard also finds tracks serving different locations so it also has constantly changing yard organization.

For most of the life of my railroad, I have used card slot identification tabs that can help a Yardmaster keep track of cars and destinations.  This is fine as far as it goes, but the switch crews need something more to help with the immediate task of remembering what destination is assigned to what track.  The card slot boxes are located in the middle of the Classification Yard, often obscured by the Yardmaster.  The Eugene Arrival/Departure Yard card boxes are mounted on the layout fascia away from the switch control panels--the remaining fascia space that was available.


Car card slot box for the Eugene Arrival/Departure Yard with slot identification tabs showing for (L to R) Ogden, Roseville, Los Angeles and Oakland. A "temporary" tag indicates track 12 holds cars for classification.

One effective way of conveying the current organization of a yard is the use of an erasable panel (e.g., a whiteboard), mounted in a convenient, visible spot such as an overhead valence.  I chose to build my railroad without valences as I find them confining and difficult to set heights for, especially for taller folk.  My operating crews reflect a fairly full spectrum of heights, with several of us significantly above six feet tall.  I thought clipboards hanging from the aisle shelves along my fascia might serve the communication and reminder purpose, but my crews have ignored these.  

One of my Santa Clara Tower operators (responsible for the Eugene Arrival/Departure Yard) suggested removable labels to be placed inside the rails of the yard tracks.  I finally took time to create a set of destination labels.  I cut my label backs from 0.020-inch styrene sheet that I cut into half-inch wide strips.  I made labels that I applied to these strips and then tapered the ends of the strips, much like a track rerailer.  


Removable track labels at the RR-West end of the Eugene Arrival/Departure Yard.  Crew feedback should let me know the preference for white-on-black versus black-on-white labels.

My initial use of the labels confirms they pose no derailment hazard. They are handy for keeping track of the yard track use/designation, especially when both ends of long tracks (my classification yard) or reverse loop tracks are involved.


RR-East end of the reverse loop tracks of the Eugene Arrival/Departure Yard.  Ah yes, the infamous "Work Mastodon" lingers from last April 1.
  

Track labels used in the Eugene Classification Yard.

I look forward to crew feedback on these labels at the next operating session.


Monday, January 21, 2019

TRACK REALIGNMENT AT SPRINGFIELD

A chronic operating headache has been the RR-East Switch at Springfield. Most every operating session has generated at least one trouble note on a Post-It .  My six-axle road locomotives just kept stumbling--derailing--at this switch.  Try as I might, I just could not identify the problem.  It took the experienced craftsman eyes of one of my regular operating crew to spot the cause. He found my mainline track kinked relative to that East Switch.


The RR-East end of Springfield with lots of trouble notes at the troublesome mainline switch.


The kink in the mainline alignment entering the switch becomes a bit more evident when a straight track tool is aligned with the straight route through the switch.

Several correction techniques were suggested by my craftsman and myself. These included ripping out the switch and putting in a new switch. This was suggested by the fact that the Springfield mainline switches are the earliest examples of switches I built using Fast Tracks tooling.  My craftsman friend suggested I try relaying just the stock rails, one at a time, leaving the rest of the switch in place.  While tempting, I resisted for a couple of months--and operating sessions. Finally, I decided to remove the mainline track RR-East of the switch in preparation for either replacing those stock rails or realigning the mainline.  

The stock rail replacement and even the switch replacement options were attractive as my current thinking about track laying suggests building switches with extended stock rails.  This would result in hand-laying (spiking) those extended stock rails into a better easement into the usual curves on my railroad.  This is one of those "lessons learned" that one acquires over the course of building and operating a model railroad.

When I loosened the mainline track from the roadbed, I found I still had a firm joint formed by the insulated rail joiner and gap filler that formed the joint between the switch and the mainline flex track.  Insulated gaps isolate mainline switches such as this one to create OS blocks for my planned CTC system.  While I could break that joint, I decided instead to exercise my third option--realigning the mainline track.

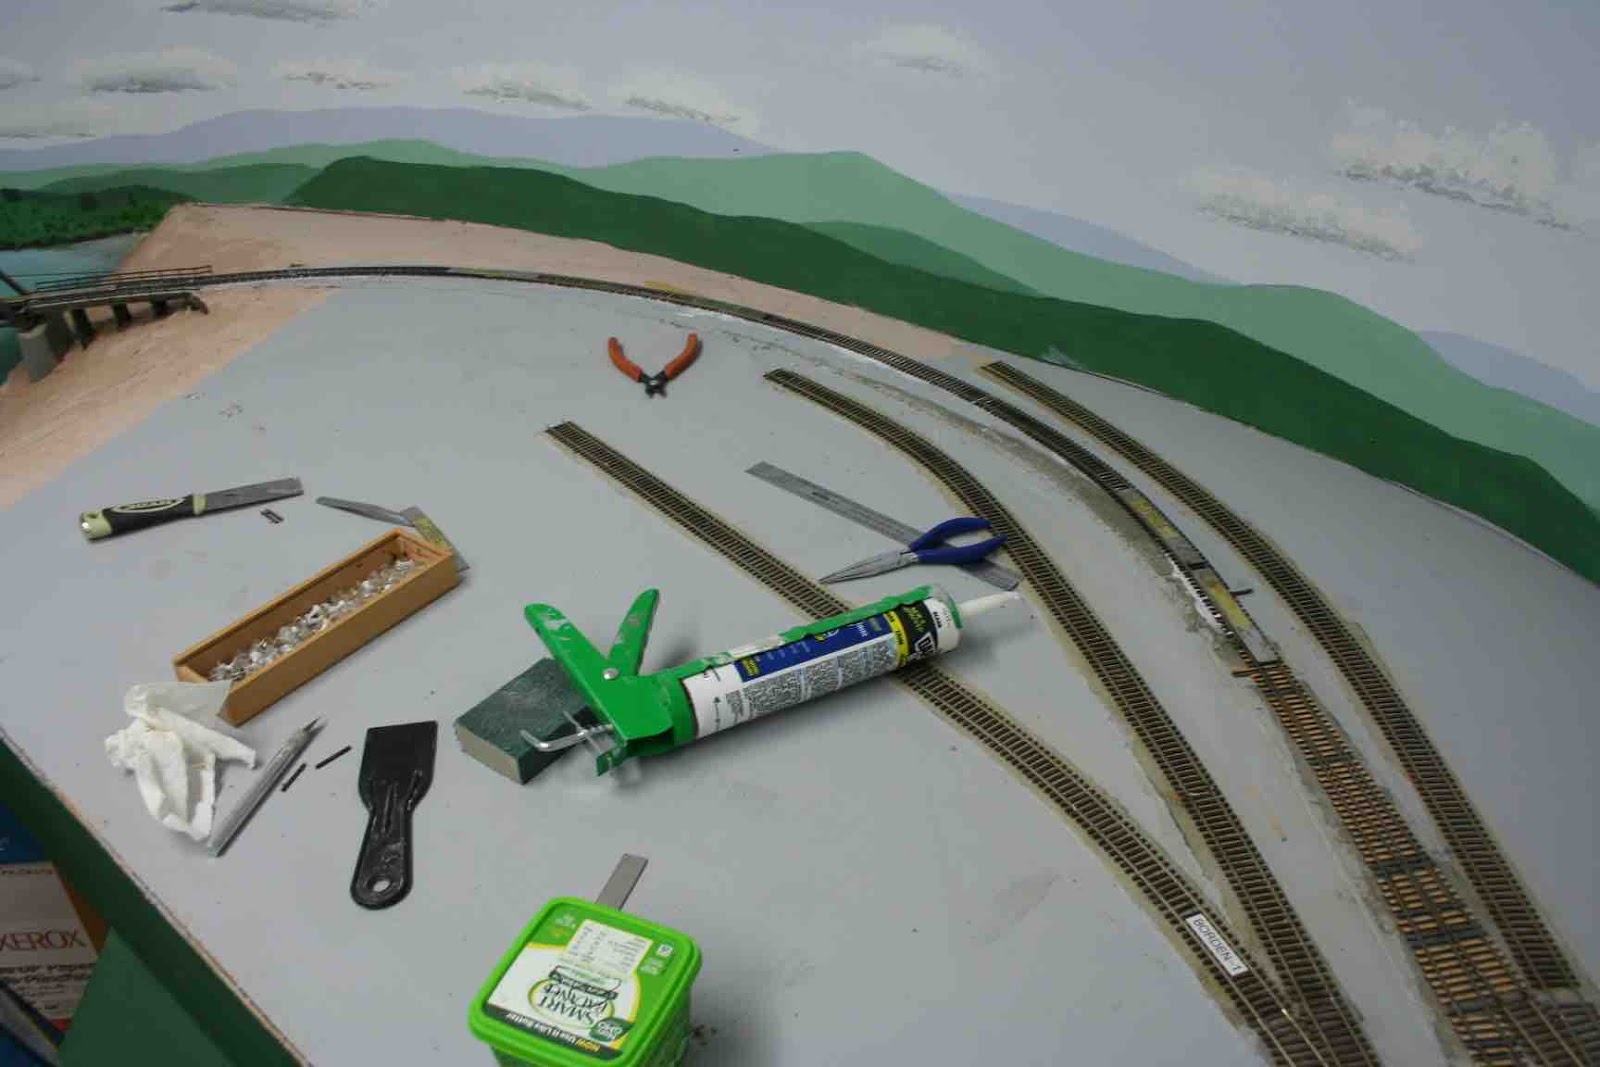
Realigning the track required a broader sweep to the curve leading to the Willamette River Bridge than originally laid.  This required expanding the width of the cork roadbed.  I expanded the roadbed by gluing another piece of roadbed to the outside of the curve upside down to match the existing roadbed profile.  Once the glue set, I shaped the new cork to the old roadbed using a Stanley Surform plane and sanding blocks.  This also cleaned off most of the remaining residue of the old adhesive caulk used to lay track.  I found myself adding more and more roadbed extension as I worked with the mainline track to form a new curve with easements at the ends.  I eventually pulled up and realigned all of the track between the troublesome East Switch and the Willamette River Bridge.  


Roadbed width expansion underway with new cork roadbed glued to the outside of the curve.  The new piece is upside down to mate the roadbed edge slopes.


Expanded roadbed shaped to match the thickness of the existing roadbed.

I reformed--realigned--the flex track, adding an additional short section in the middle to account for the now slightly longer track alignment.  I pulled out my Ribbonrail track gauges to help the realignment. I began with one of my ten-inch straight gauges at the bridge end and used the five-inch gauge at the switch end.  I then used a 48-inch radius gauge at the switch end to help create a better easement into the curve.  The bridge end was formed by eye, though checked with the broader curve gauge, as well.  I was pleasantly surprised to find I could form the major portion of the curve using my standard 42-inch curve gauge.  I expected I might need to tighten the curve to 40-inch radius, but I was able to maintain my mainline standard of 42-inch radius.  

Finally, it was time to apply caulk and glue it all back into place. The Ribbonrail track gauges were left in place at the ends and at track joints as the caulk set.  I also held down the track with my standard method using cans of baked beans (or any other canned goods).


Realigned track in place with track gauges ensuring critical spots maintain the desired alignment.

New track electrical feeder holes were drilled for both the existing feeders (pulled out of the way during track-laying) and new feeders for the new piece of track placed in the middle of the curve.  This maintains my construction standard of a feeder soldered to every piece of rail.

Finally, the moment of truth arrived to test out the new alignment.  I ran several of the most troublesome locos over the new track alignment. Most of the trouble tags identified the loco that derailed--an important part of the troubleshooting process.  Many of the chronic offenders were SD45T-2 models.  I have no explanation for why these and not the equal frame-sized SD40T-2s or of the other SDs with the same six-axle truck dominated the tracking problems.  I just accept that those were the troublesome units.  A final check was done with an EULAT train I needed to re-stage up to Crescent Lake for the next operating session.  This added 89-ft. autoracks and TOFC to the mix.  I am happy to report all have passed through the reworked track just fine. The next operating session in a couple of weeks will be the "acid test."


An EULAT passes through the reworked curve and approach to the RR-East switch at Springfield.  Success!