Track and roadbed at Springfield have been permanently
affixed. With track centerlines
marked, the cork roadbed was glued in place. http://espeecascades.blogspot.com/2013/01/springfield-track-and-roadbed-1.html The sheet cork pads for the three major
switch complexes (ends and the mid-town cross-overs) were faired to the heights
of connecting standard cork roadbed.
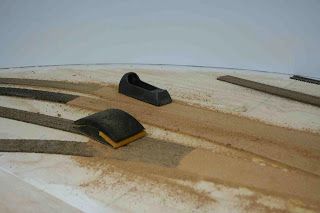
This was accomplished with a Stanley Surform™ and 60-grit
sandpaper. The rest of the roadbed
was sanded for uniformity.
Height fairing of cork sheet.
Rail (code 83 to code 70) and tie height transitions (Fast
Tracks to Micro Engineering) were accounted for with cardstock glued to the
roadbed where the transitions occur.
Tie height transitions formed by
cardstock.
Throwbar slots were created by first drilling a ¼” hole at
the center and then expanding with a router bit. I got a little “enthusiastic” with the router as I learned
to handle it, so I needed to go back with some wood filler. It’s an imperfect job, but I’d rather
err on the side of free function of the throwbars. I also had to drill holes for the frog wire feeders to the
Micro Engineering turnout frogs.
Throwbar slot routing.
Another item that needed to be accounted for before laying
track was creating holes and hatches for Kadee uncoupling magnets that will be
mounted on hinged flaps. Three of
these are located on tracks well away from the aisle edge –locations difficult
to reach for “manual” uncoupling.
I’ll describe my uncoupling magnet mounts in a subsequent post, once I
complete the installations.
Roadbed hole for uncoupling magnet.
The final bit of roadbed preparation was a coat of
paint. This both seals the cork to
slow its natural drying out over the years (I hope!) and provides a good basic
gray color.
With the roadbed prepared, the track could be laid
permanently. Prior to attaching
the track, I relaid the track to be sure everything fit where I expected it to
fit. I also took the opportunity
to join groups of turnouts into continuous assemblies by soldering their rail
joiners together. I also joined
two or three sections of flex track in the same way. This ensures critical alignment for these groups and made
handling them easier during the track-laying process.
I used Dap 230 caulk in both aluminum-gray and clear
varieties to affix the track. I
laid a bead of caulk over a “fair stretch of track--often a run of multiple
sections of flex track or a turnout assembly. The caulk bead was spread (like butter) with a putty
knife. The track was then placed
in position. Track sections were
joined and then final alignment set using several RibbonRail curve tools and
the “Mark 1” eyeball. The caulk
provides decent working time, but also sets quick enough to allow work on
multiple tracks without disturbing prior track laying.
Track and roadbed permanently laid at Springfield.
RR-West end of Springfield and Marcola Branch track viewed
from Westfir.
Now that the track is down, the wiring and switch machine
installation begins!


No comments:
Post a Comment