Thursday, August 30, 2018

BELOW CRUZATTE

My terrain forming efforts finally turned to filling in the gap alongside Cruzatte.  Below Cruzatte are my Tunnel 20 and the RR-East end of Wicopee.  With my narrow shelf construction around the walls, the terrain slope must be steep.  While I might have spread the distance between the lower line, including Wicopee, I chose to keep the layout space narrow for easier access to Cruzatte and to provide for wider operator aisles.  I hope to conceal some of this with trees, but for now, the base terrain emphasizes the height difference between the two lines.

Terrain construction followed my now-familiar pattern of establishing top and bottom bases for sloping Styrofoam slabs.  I tried to provide a few bump-outs and outcroppings to break up the otherwise flat slabs.  I also was able to angle a few of the slabs and indent them to break up the surfaces.


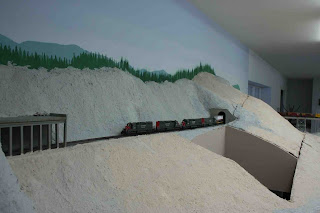
Terrain base between Cruzatte above and RR-East Wicopee below.  

Several special requirements were catered to during the construction. First, I finally needed to build up abutments and then fill around Cascade Creek.  Cascade Creek is spanned by a pair of deck girder bridges toward the RR-East end of Cruzatte.  A waterfall is on the uphill side of the railroad.  I needed both the uphill waterfall and another one on the downhill side. The lower waterfall needed to "flow" into a creek that I chose to route along the tracks to join Noisy Creek. All of this eventually becomes Salt Creek on my railroad.  Consider this the compromise necessary with selective compression of the real geography to fit into a basement layout space.


Cascade Creek formed with waterfalls on both sides of the tracks.

Another terrain issue was providing access hatches.  One of these was the second hatch covering the footpad for access to the deep part of the Shady Creek scene.  I used three-inch thick Strofoam to help form the opposing terrain forms for this hatch.  I then formed long terrain slabs from Tunnel 8 above down to the base near the lower track below, attaching them with caulk to both of the three-inch terrain formers. Finally, I used a saw to cut the top shell slabs, using the slight gap between the formers to guide the saw.


Cutting the upper end of the hatch covering the footpad for Shady Creek access.  Tunnel 8 at the RR-West end of Cruzatte is above.  The lower track connects McCredie Springs to Wicopee.

I also needed to provide hatches for access to future signal locations. Four signal assemblies will be installed at Cruzatte--two at each end.  Most of these hatches were simple affairs of two 4-inch wide Styrofoam slabs glued together with a reinforcing slab and propped between the lower base and the plywood subroadbed for Cruzatte.  One of the hatches needed to be wider to account for a support arm for the Cruzatte roadbed.  The exact signal location may fall on either side of this support, so I used a 16-inch wide Styrofoam slab for this hatch.  Each hatch has some sort of extra formation to break up the otherwise flat slab.


RR-East Cruzatte signal access hatches removed.

After filling gaps and adding to the slab formation with spray insulating foam, I carved and shaped the terrain slabs.  Finally, I added the Sculptamold.  It took two separate three-hour sessions to cover the very large area of this new terrain work.  I used a stiff Sculptamold mixture to counter the steep slopes and the even steeper undersides of the many outcroppings.  Fortunately, such stiff mixtures set up a bit quicker--overnight versus a couple of days with wet mixes.


SPX9232W climbs up through East Cruzatte and over Cascade Creek.


SPX9232W rolling through the RR-West end of Cruzatte.  The full expanse of the new terrain can be seen extending between the tunnels at each end of Cruzatte.

Filling in the terrain below Cruzatte completes most of the terrain formation along forty feet of my basement wall.  One easily imagines being in the mountains.  There is a lot less bare plywood showing! 

Saturday, August 18, 2018

SCENERY HATCHES FOR TUNNELS 9 AND 10

As I built the terrain shell for Noisy Creek Trestle (https://espeecascades.blogspot.com/2018/06/noisy-creek-trestle-and-tunnel-9-terrain.html) I realized I needed to retain a pair of footpads straddling the trestle area for access to the far back corner.  The need for those footpads was dramatically shown by one of the photos in that prior blog post, showing me up on the layout slathering Sculptamold onto the terrain shell. Those footpads needed removable terrain hatches.

I began the hatch terrain project by creating a duplicate set of baseplates to serve as footpads when the hatches are removed.  I then covered the scenery hatch base plates with slabs of Styrofoam to serve as bases for further Styrofoam construction.   Back profile panels were erected to match up to the existing terrain around Tunnel 9 and the RR-West portal and shed system of Tunnel 10. Side profile panels were added and a front profile plate for the Tunnel 9 hatch was created.  The scenery at the base of the Tunnel 10 hatch forms the creek and is at the same height as the base plate.


Tunnel 9 access hatch base plate.  At this point, the base plate completely fills the space between the fixed scenery and roadbed in front and the wall behind.


Terrain profile panels in place for both access hatches. Tunnel 9 is on the left.  Tunnel 10's RR-West rock shed is on the right.

With the edge profiles defined, I filled in the remaining terrain slopes with slabs of Styrofoam.  Some of the slabs were built up with two or three sections of my standard one-inch foam material to provide more depth for carving.  I then used spray foam to fill cracks and gaps in the shell.  Once all of this set, I shaped the terrain using knives and my Surform scraper.


Terrain shells for Tunnel 9 and 10 access hatches with spray foam applied.

Moving toward finishing the terrain shells, I needed to test the hatch removal.  Tunnel 10's hatch removed fairly easily, but the Tunnel 9 hatch proved very difficult to remove.  After much banging and exertion on my part, I found the front corner of the Tunnel 9 hatch extended a bit too much.  It both caught the fixed terrain profile in front of it and caught the roadbed at Wicopee when trying to lift it straight up.  Trimming work with my oscillating saw (a new tool acquisition this year) freed the hatch and allowed me to remove it.  I trimmed it further with my circular saw. The hatch base plate does not need to fit snuggly into the hole.  Only the terrain should be "snug."  


Tunnel 9 hatch with front left corner trimmed using the oscillating saw. This will remain a tight fit, but the hatch is now removable.

The final step in this project--for now--was to apply the Sculptamold covering to the Sytrofoam shell.  I used wax paper at the edges of the shells to retain an edge separate from the fixed scenery.  With these two terrain hatches built up, the terrain around Noisy Creek Trestle is a bit more complete.


SP X9322W serving as a BRLAT (Brooklyn <Portland> to Los Angeles Trailers) crosses Noisy Creek Trestle with the flanking terrain hatch panels in place.

Wednesday, August 1, 2018

THE RAILROAD AT YEAR SIX

Each year around the August 1, anniversary of the official start of construction in 2012, I do a photo survey of my railroad.  This helps me and you readers see what progress I have made in the preceding year.  Last year's post can be found at:
You can link back to prior years via a similar link at the top of each of the annual surveys.

This past year saw me make major visual progress on the railroad. Bridges, trestles (viaducts), tunnels and terrain have sprouted over much of the mountain grade portion of the railroad.  Prior years saw the primary construction, fleshing out of the initial core (finished just in time for the August, 2015, NMRA National Convention), refinements prompted by regular operations, and a beginning on structures for industries served by my railroad.  

This year's photo survey will follow the CZLAT (Crown Zellerbach to Los Angeles Trailers) RR-Westbound from Eugene to Crescent Lake.  This is one of the trailer and auto rack trains added to my regular operations in the past couple of years.  Those long cars challenge clearances and roadbed vertical kinks introduced during construction.  By late 1984, the CZLAT had developed from a mostly boxcar train to one with TOFC (Trailer On Flat Car) equipment as wells as the box cars of paper products (think "TP").  

This photo survey will include more photos than usual, befitting the major visual changes introduced this past year.  The captions will highlight those changes.


The CZLAT, running as SP X8283W, prepares to leave the Eugene Arrival-Departure Yard.  A full house in Eugene put the CZLAT on AD-Track 7 instead of the preferred use of tracks 1-5 for Portland-originating traffic. This past year we reversed the normal operating direction in the reverse loop tacks that make up the Arrival-Departure Yard.  This makes it easier for the Santa Clara Tower Operator and road crews to identify the motive power on RR-Westbound trains.


X8283W rolls past the Eugene Depot.  Many of the structures here were 2017 additions, seen in last year's survey. GP9s have taken over yard switching duties as I wrestle with electrical contact and other running issues on my fleet of SW1500s.


SP 8283 crosses the Willamette River between Eugene and Springfield.  


The CZLAT continues RR-Westbound through Springfield.  Springfield is a major industrial complement to Eugene. It looks like I should spend some time filling in structures and an initial scenery treatment here.


SP X8283W rolls around the Marcola area on the railroad.  I built that grain elevator more than four decades ago and it has followed me around the country.  It still serves well.


SP 8283 rolls onto the bridge over the North Fork of the Willamette River at Westfir.  The old Western Lumber sawmill complex continues to provide lots of carloads to the SP on this railroad!  This past year, I built up and finished the major sawmill structures.  I finally sorted out how to represent the log pond as an entrapment of part of the river.  This cleared the way to add the basic terrain shell to the area.


The CZLAT pokes out of Tunnel 22 at the RR-East end of Oakridge.  As a priority train with TOFC cars entrained, the CZLAT takes the mainline through town. Lower priority freight trains without the long cars are routed into the yard at Oakridge to have helpers place mid-train.  The CZLAT will get its helpers on the front of the train.  Tunnel 22 through "THE" Oak Ridge was bored during the Harriman era.  The Oakridge Turn power is in the foreground, waiting for its crew to come back after their eight-hour rest and return to Eugene by way of Westfir.  


A pair of SD39s are today's helper power for the CZLAT.  The SP bought SD39s for helper duty in the Tehachapi Mountains of Southern California and similar duty on other nearby grades. With their long end porches and full light packages, they are very appealing to me, so here they are, transplanted to Oregon!  

As alluded to above, SP operating rules required helpers to be placed on the front of trains containing long equipment such as the 89-feet long TOFC cars in the CZLAT.  My SP Dispatcher friend notes it was easier and faster to put point helpers on the train while occupying the mainline rather than entering the Oakridge Yard. Trains without the long cars do go into the yard to have mid-train helpers entrained.  That is a longer process which includes more time to make the air brake connections and perform an air test.  Today's CZLAT, though, gets the priority treatment of a point helper.


With the air test complete, the CZLAT begins the major climb toward the top of the Cascades as it crosses Salmon Creek, just out of Oakridge.


The CZLAT climbs up into McCredie Springs, one of the first major sidings above Oakridge.  Tunnel 21 is high on my list of future terrain forming efforts.


Climbing out of McCredie Springs, the CZLAT crosses the bridge over Eagle Creek.  I just finished this scenery effort at the end of July.


Here is a wider view of the Eagle Creek area, with Shady Creek Trestle looming above it.  That steep canyon needed to drain somewhere, hence the bridge over Eagle Creek.


Our point helper set emerges from Tunnel 20 as it climbs toward Wicopee. A train waits on the mainline above at Cruzatte.


Climbing out of Wicopee, our train crosses Salt Creek Trestle.  This is the longest trestle (viaduct) on the line. Highway 58, the Willamette Pass Highway, passes underneath.


Another view of our train crossing over Highway 58 using Salt Creek Trestle.


Our train skirts along the rock face between Tunnels 10 and 12. Tunnel 10 has open gallery rock sheds at both ends.


Noisy Creek Trestle spans between the rock shed portals for Tunnels 9 and 10.


The CZLAT meets an RVEUY which is holding the main at Cruzatte for the meet.  Wicopee siding can be seen below.  Though fore-shortened in my model, the tracks really do stack closely in this stretch of the Cascade climb.


Our train emerges from Tunnel 8 to cross Shady Creek Trestle and then plunge immediately into Tunnel 7.


Tunnel 5 has a long open-gallery rock shed at its RR-West end.


The climb is about over as our train crosses Trapper Creek after emerging from Tunnel 3 at the summit.


With the Cascades conquered, the helper is removed from the CZLAT at Cascade Summit.  The helper is joining another helper set on the Beattie Spur--actually a short siding. The helpers will await the pleasure of the Dispatcher for their return to Oakridge.  Depending on traffic and any urgency for helpers at Oakridge, the Dispatcher may send the helpers back down the hill light (alone) or may put them on the point of a RR-Eastbound to help a train downgrade with their dynamic brakes.


Journey's end on my railroad, the SP8283West rolls to a stop in upper staging at Crescent Lake.  Historically, Crescent Lake was the Division boundary between the Shasta and Portland Divisions of the Southern Pacific.  It had a modest yard and a depot with Train Order Operators for both Divisions.  This makes a logical end for my railroad.