Pages

Thursday, October 27, 2016

OAKRIDGE CROSSOVERS

An important track feature needed for the Oakridge Yard was noted as soon as we started operation on the full mainline of my SP Cascade Line last year.  With my original track arrangement, helpers had to be cut into RR-West trains at the RR-West end of Oakridge.  This tied up the entire yard throat, yard tracks, and the Salmon Creek block—the next operating block RR-West of Oakridge.  One of my retired SP engineer operators was serving as a helper engineer, and noted: “ Hey Bill, weren’t there crossovers in the yard?” 

I laid out my Oakridge Yard using a track diagram from Austin and Dill’s “Southern Pacific in Oregon” book (PFM, 1987).  The same diagram also appeared in the meet booklet for the Espee in Oregon Meet held in Oakridge in about 2005.  Both diagrams ended at the Crestview Street overpass—roughly halfway into the yard, but encompassing the depot and engine facilities, including the wye.  I failed to study closely the map on the aforementioned Oakridge Meet booklet which confirmed the crossovers RR-East of the Crestview Street overpass (off the diagram).  Operations logic should have alerted me to the need, as well.

The operational need has been compelling.  Adding the missing crossover switches has been on my short list of high priority track projects.  Not only do the mid-train helpers need the crossovers, but the Oakridge Turn could use them to good advantage as well.  I needed a couple of months’ break from operations to do this task, something created by my schedule conflicts this Fall. 

The revised Oakridge track schematic shows the function of the crossovers.  RR-West trains can use the Pope and Talbot spur as a switch lead to help clear space for the helpers.  This lead is regularly used by the Oakridge Turn for similar work.  This will be a busy track, but it will relieve the mainline.  Indeed, I will post a new special operating instruction for the next operating session instructing all RR-West freights to enter the Oakridge Yard and not use the Oakridge mainline or siding unless ordered to do so by the Dispatcher. 


Revised Oakridge track schematic.

I assembled a half dozen new switches, including one curved switch, to fit into the yard.  The first photo shows the switch tie blanks laid on top of the existing tracks.


New switch tie blanks laid on top of original Oakridge track.

Having laid out the proposed locations of the switches, I drilled pilot holes for the throw rod activation slot.  I stuffed each of these with a piece of wire to indicate the proposed switch point locations underneath the layout.  This revealed a couple of modest position adjustments to avoid layout support joists and legs.  I had to accept that a couple of the switch machines would be located immediately above a main bench-work L-girder.


Proposed switch throwbar locations indicated by wire stuffed into pilot holes.

With the switch throwbar slots located, I removed existing track segments.  This was simply done by flooding the track with alcohol, which softened the Dap 231 adhesive caulk used to attach the track. A putty knife was used to pry up the track, salvaging most of it.  The throwbar slots were drilled and enlarged with a router.  The new switches and connecting track segments were then laid to restore the tracks.  This was followed by switch machine installation.  Wring for the switches and switch machines was done and the track placed in service.


Tight quarters under the layout for a couple of the switch machines.


New crossovers installed at Oakridge.


Crossovers in use.  A helper set is crossing over to couple to the rear of a train on Yard-2.  The Oakridge Turn is sitting on Yard-4, waiting for the through freight to clear out of town.

Thursday, October 13, 2016

ANOTHER ROADBED HUMP AND TWO SAGS

As my railroad settles in—literally—I have found several more roadbed anomalies.  A big part of this is that the “complete” railroad has gone through a full year of seasons and with that changes in moisture levels.  As we were re-staging the railroad in September, we found a dramatic sag at the RR-West end of the future Noisy Creek trestle.  The pilot couplers on a pair of SD40Rs dug right into the ties on the trestle.  I still do not understand why the many SD45s that have run past this same point have not found the same fault, as they have the same frame, wheelbase and bolster to coupler distances as the SD40R.  Nonetheless, a severe sag was revealed.  Needing to correct that sag, I also tackled a couple of other nearby roadbed anomalies I had grown intolerant of.


Sag at the RR-West end of Noisy Creek Trestle.  The board on top of the track represents a continuous grade extending down from the Cruzatte siding.  The dip at the4 junction between trestle and standard roadbed is depressed by more than a half inch as indicated by the spacer between the track and the board.  Yikes!

The correction for this sag involved removing the wall mountings for the three roadbed support brackets on the right.  They were then reattached to the wall at new, higher, locations, beginning with the bracket on the right that supports both standard roadbed and the trestle central spine. 


Test train approaching the remounted Noisy Creek Trestle support.  No more pilot coupler digging into ties!

The second area attacked was a hump in the middle of Cruzatte.  I previously dealt with one further downhill.  This one was at the uphill end of the same eight-foot plywood roadbed panel.  Chalk this one up to the rapid construction needed in 2015 to complete the railroad for the NMRA National Convention in Portland.  Add in a year of seasons and the hump had become an issue, particularly for long freight cars.  Comparing roadbed issues I have had with Cruzatte’s set of plywood panels with Wicopee’s complete spline construction without issues, I can see I should have done the same roadbed at Cruzatte.  I will soldier on with the current roadbed, but continue to adjust it until I gain satisfaction.


Hump in the midst of Cuzatte.  Look at the area around the plywood joint.


Correcting this hump required sanding down most of the cork roadbed over the plywood subroadbed joint.


Success at Cruzatte.

The final bit of roadbed tweaking was at the RR-West end of Salt Creek Trestle.  I had worked in this area before, but now a roadbed sag revealed itself further up-grade.  I fixed the sag by applying vinyl spackling compound.  This was easily sanded to the desired grade—much faster and a better outcome than my previous effort filling with glued-on sheets of balsa.


Roadbed sag illustrated by the gap under the rule between about 12 and 26 inches on the rule (upper scale).


Track removed RR-West of Salt Creek Trestle as part of the grade smoothing.


The test train is doing much better through the approach to Salt Creek Trestle.


Although I have conducted operations on my railroad for the past year and a half, I continue to adjust both roadbed and track as I find issues.  This is a natural part of the settling in process for a model railroad.  I am now conducting tests with the most demanding equipment—trailer flat cars.  They have a very long distance from truck bolster and king pin to coupler face.  Add their long length and one has a device that finds the vertical imperfections in trackwork.  Now is the time to clear these issues—before scenery!

Tuesday, October 4, 2016

ESPEE IN OREGON 2016 – ROSEBURG

Forty or so fans of the Southern Pacific in Oregon gathered this past weekend for the 2016 edition of “Espee in Oregon.”  This year’s meet followed the format of most of these meets with a day of prototype or industry tours and a Saturday full of informative presentations related to the meet location.  Organizer Rod Loder has an amazing ability to pull the disparate elements together, often at the last minute.

The meet began on Friday, September 30, with two industry tours:  Whit-Log, makers of log bunks for log trucks, and Swanson Group’s stud mill on the south side of Roseburg.  Though not directly tied to rail transportation, the tour at Whit-Log was conducted by the current generation head of the Whitaker family firm.  His comments throughout the tour demonstrated how his firm has survived and thrives in a very cyclic business supporting the timber industry.  Continuous improvement, innovation, and successful application of changing manufacturing technology were highlights. 

Among many items we learned about was the need for different sized log bunks to match highway gross weight standards to the density of the tree species being harvested.  This results in various bunk sizes, numbers of axles on both truck and trailer, and numbers of bunks on each.  We could see examples of this both in the construction yard and across the road in the log truck fleet operation also run by the Whitaker family.


The 2016 edition of Espee in Oregon Meets kicked off with a tour of the Whit-Log manufacturing facility north of Roseburg.


Newly equipped log truck for Freres Lumber, ready for delivery.  The log bunks have extension tubes that are raised for maximum-sized loads.


A different truck and bunk arrangement for Whitaker’s own fleet of log trucks.


A blast from the past—an older, lower capacity log truck kept on by the Whitaker family.

Our afternoon tour took in the Swanson Group’s studmill on the south end of Roseburg.  This fair-sized mill produces two-by studs of various widths, lengths and grades to satisfy construction industry needs.  The mill was a marvel of fitting multiple production lines within a given building volume.  One line would be placed over another while yet another might cross both of the first two lines.  The mill was highly automated, yet human intervention was required at every step along the way from raw log to finished stud in a lumber unit ready for shipment. 


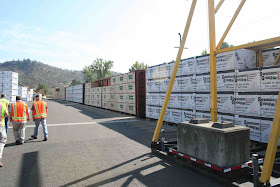
Units of studs air drying at the Swanson Group studmill.


A pair of head saws are contained within all of this machinery.  They make the first slices through the log, producing cants that will be further sawn and milled to produce the desired stud sizes.


Lumber cants fresh cut from a log being maneuvered into the production line.  The cants will be further sliced to make 2x4s.


Studs rolling along the line after having their picture taken on both sides.  The pictures are analyzed by a computer to automate grading of the resulting stud.  The automation is backed up by human sight, but the vast majority are computer-graded.  The studs then get dropped into the appropriate grade bin further down the line.  It reminded me of an old computer punch card sorter.


Steam plant and drying kilns (to the right).  Moisture content is carefully controlled for higher grades of lumber.

  
Most wood chips are moved by truck now—a low or no profit business largely conceded to trucks by the railroads over the past decades.


Swanson ships much of their stud product by rail.  This mill ships a half dozen or so cars a day. 


Higher grade studs are shipped as wrapped units.  Lower grades are shipped uncovered.

After the pair of industry tours, we visited several local model railroad layouts and then gathered for a couple of evening presentations on railroading around Roseburg.  Roseburg was on the original rail mainline between Oregon and California.  Indeed, Roseburg was at the end of track where construction of the Oregon and California railroad stopped in the financial panic of 1873.  Construction resumed under new ownership almost a decade later.

Saturday brought us many interesting presentations, beginning with former-Forester Lloyd Palmer’s photo essay on conifers.  His illustrative pictures and talk helped better understand how to model the forests I need on my own SP Cascade Line.  From there, the presentations included photo surveys of the Siskiyou Line (the name of the original mainline), aerial photos of the many lumber mills along the line from Springfield Junction south to Ashland and even Hilt in Northern California.  The 1926-built Natron Cutoff took off from the original mainline (Siskiyou Line) at Black Butte, behind Weed, California and reconnected at the north end at Springfield Junction.  Though reduced to secondary status by the new mainline, the Siskiyou Line was a rich source of forest products shipments.

Other highlights included Bruce Barney of ALW Lines (http://alwlines.com) describing his new second-hand 3-D printer.  He has several new 3-D printed products in his ALW Line, including a pair of SP standard steel water towers.  Yes, one of the kits for the unique Oakridge variant (three steel plate rings versus the standard five rings) came home with me.  Elizabeth Allen presented her (coauthored by friend Brian Rutherford and Harry Wong) survey of SD45 detail variations.  She has presented this previously at Rail Prototype Modeler Meets, but this was my first opportunity to see it.  The meet concluded with a photo show by “Photo Bob” Morris of Dunsmuir.  Bob’s narration had us rolling on the floor with laughter—a great way to end!


Rod Loder has put together quite a string of very successful SP meets here in Oregon.  He has been trying to get one set up in Indio, California, where Rodney spent time in his youth.  Folk interested in the SP Sunset Route need to attend!